Omega GDPR/CCPA Cookie Banner FAQs
1. How to enable EU GDPR Cookies?
By default, the app is disabled when you install the app.
Enable Omega GDPR/CCPA Cookies Banner (or Omega Cookies Banner) by clicking on the green Enable button in the Dashboard.

You can show an EU GDPR compatible cookie banner, informing your customers that your store is using cookies.
Also remember to embed the app into your theme. This can be done by following the instruction in Dashboard

Or do the following:
- On your Shopify admin, to go Online Store and select theme
- Click on Customize
- On the left menu, go to Embed App
- Turn on Omega Cookies Banner
2. Set up your cookie banner
2.1 Set up and customize your Cookie banner
2.1.1 Where to set up the banner
To begin setting up your cookie banner, click on Settings on the left menu, right under the app's name.

Upon clicking, you will be sent to Banner Settings tab, which is where you can set up how the cookie banner will look like and the message written on it.

2.1.2 Quickly set up the banner using our templates
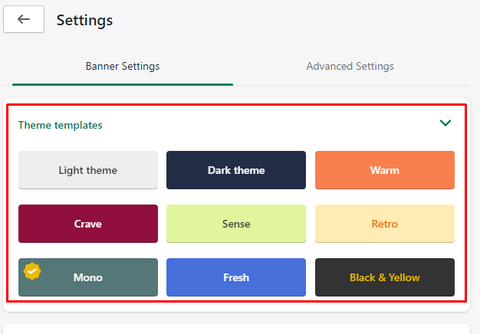
Immediately after going to Banner Settings, you will be met with 9 theme templates. These are all designed to help you guys set up quicker.
2.1.3 Set up how the app should function
After the templates, you should see the part where you can set up your app.

The explanations for each toggles are as followed:
- Banner's cookie icon: The appearance of a cookie icon on your cookie banner. This may help non-native speakers recognize that the banner is for cookie consent purpose.
- Show on home page only: If turned on, the banner will only appear on the home page, and no where else on the website.
- Show dismiss button: Allow customers to decline cookie consent. This may be compulsory in some regions.
- Cookie button for changing preference later: If turned in, a cookie button will appear on your site so customers can change their cookie preference later should they change their mind. The visual of this button can be customized.
- Don't show banner again next time if dismissed: Normally people would be asked for their cookie consent until they give their response. If turn this on, they won't be asked again if dismissed.
- Show preference button: Some regulations require websites to allow customers to select which cookie they give consent to and which they don't. A preference button will enable that.
- Create Policy Page: The text you enter here will be the title of a new page which refers to your site's cookie policy, and a link will be created in the Text customization section. If you already have a privacy policy, consider not enter anything here.
2.1.4 Design your cookie banner
You can edit the coloring of your cookie banner in Banner design section.

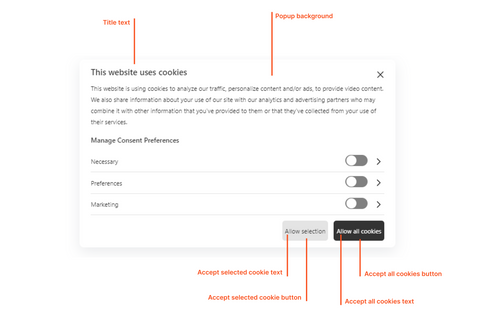
The components on the cookie banner are as followed:

The components on the preference selection popup are as followed:
2.1.5 Edit your cookie banner's texts and messages
Similar to color editing, you can also change the texts in Text customization.

The parts in the cookie banner where you can edit texts are as followed:

To make the banner more visually aesthetic, you can edit your text size as well.
The link to privacy policy can be added in the Link of your Privacy Policy's page part.
The parts in the preference selection popup where you can edit are as followed:

2.1.6 Position your banner
How your banner will appear on your website can both affect regulation compliant and customers' online shopping experience. Change your cookie consent banner's positioning in Positioning section.
By default, the app's layout will be popup.
Choose where the popup will be placed in the Position of banner part.
- Upper/Lower center: The banner will be placed in the middle of the screen. You can choose to have it appeared on the bottom or the top. On top of that, move the banner further into the middle by input in the Margin from edge. The width of the banner can also be adjusted in the Banner width section.
- Corner popup: The banner will be placed where you choose. There are also visuals to support your decision. Likewise, you can also move the banner further into the middle by inputting in the Margin from edge ....
- Center: The banner will be placed in the absolute middle of the screen. You can change the width of the banner however you like.
On the other hand, you can select a different layout, which is on the Side of your website.
For this option, you can only choose to display it either on the left or on the right.
2.1.7 Select who to show the cookie banner
The part called "Display restriction" is where you can select who to show the banner to.
For some countries, a cookie banner is strictly required, though some aren't.
For this section, you have 2 choices:
- Enable for all countries: No matter who they are, where they are visiting from, the cookie banner will always appear.
- Enable for specific regions only: Only the people who access your site from the selected regions will see the banner. There are 6 regions, including EU & UK, California (USA), Colorado (USA), Japan, Brazil and the Singapore.
- Side of your website: Choose left/right as your demand


2.2 Advanced Settings
- Browser cookies lifetime: Basically, it means how long will the cookie consent still remain valid and after which they will expire => consent needs to be given again=> pops up the cookie bar again. Now it's set to 60 days - default. + - are available
- Custom CSS: you can add code to customize the display for the banner if needed.
3. Manage Cookies
The app will automatically scan all cookies on visitors’ browsers and save them into the Cookies table.

You then can manage your cookies here, the app will display all available cookies on your store and categorize them based on the document from Shopify, the rest you can edit by yourself.

- No: The counting of the cookies
- Title: Name of the cookie
- Description: A few words to describe what that cookie does
- Category: The category which this cookie will appear in on the Preference selection popup
- Status: If you publish this cookie, it means you will use this cookie and hence will be listed in your Preference selection popup.
- Scanned: If the cookie is scanned from customers' website, it will appear as "Yes", if the cookie was manually added, it will appear as "No".
- Action: You can Edit (category, title, description, publicity) or remove the cookie here.
You can also add more cookies:

3. Manage Categories
Manage which category will show in the Preference section here, you can also edit/ add categories.
Make sure that you have published the categories and by default there will be one marked as Necessary which will be checked by default and cannot be unchecked.


4. Manage Users
Consent log tab let you know which customer has accepted the cookies on your store, you can export/ delete the data.
NOTE: User data is saved within 60 days, unless you change in the Advanced Setting.

We can offer any customization you want
Including (but not limited to) banner customization, cookie preference customization, Omega Facebook pixels and TikTok pixels integration and more (much more)